
I am so back and forth with this blog.. But thats how I am with anything in life! Even if I love it, I tend to get bored after awhile and need to come back to it later.
Well its later. Lets see how this goes. With only 3 months and some odd days till Christmas (?!?!?) I have been trying to crochet up some gifts. I will post them and links when I get done.
Also been feeling crafty so made post up halloween and Christmas crafts. Along with my best friends first childs, first birthday presents. Lets see how this goes.
Also side note, I been trying to lose weight and last month I lost 9 pounds! Hopefully I can keep that up.
Tuesday, September 13, 2011
Tuesday, May 31, 2011
Internet Failure!!!
Ok so I havent posted all weekend because my internet connection just died on me, and since it was Memorial Day weekend I was not at work to use their computer. I am at work now so hopefully when I get home the nice internet men will have it fixed
So here is a short view
Thursday - built a flower box outside and planted flowers
Friday - Crochet my own pattern for an eye mask. Will add the tutorial later if I can
Monday - Lepord nail polish pattern.
Once I get home and if the internet is running I will be sure to add pictures and for details. This is just a place holder till then. :)
Hope all had a good Memorial day and remember to thank a Vet or keep an active in your prayers.
Happy Crafting :)
Wednesday, May 25, 2011
Today I made a cake. But not just any cake
DOMO cake.
It was to have to celebrate American Idol. Which by the way Scotty won and my mother lost it with joy.
Cake was simple chocolate cake
chcolate icing.
white and red for the mouth and black for the eyes.. which I just used food dye for it.
Also This may show up as the 26th because its after midnight here... I was busy lol
will add pictures and details later :)
Tuesday, May 24, 2011
30 Day Challenge Day: six
I have been wanting to do this project since I first decided to do my 30 day challenge, but I didn't have the right material so I had to wait. Found just the right fabric online and it came just in time so tonight I got to try it out
Braided bracelet from vanessachristenson blog. I suggest watching the video for more info (and a little laugh) .
It took me a few tries to get it the right tightness.. I would get half way done and have a spot too loose and start over but finished my first bracelet..

It was actually a little too loose for me so I turned it into an anklet.

Next try I used my moms wrist to help so I wouldn't have to take it off my fingers and it worked a lot better.


its super cute and the color is bright and summery and looks great next to a tan (which I am working on) It looks pretty thick on but I like that, and good thing about it is the fabric is cloth so if it gets wet, it wont hurt it. But if you do ruin in its okay too because it is so simple to make once you get the hang of it. You could make one of every color and switch it up or where them all together!
On another note, Tonight was American Idol top 2 competing.. Scotty and Lauren. They both did great and are the youngest finalist yet so I am pretty excited to see who will be season 10's American idol.

Scotty is a great country singer.. his voice just melts your heart and he sounds like he could have an album out today. he is a cutie and a total sweet heart.

Lauren on the other hand is a great country singer too but has more of a range to me that I like. She is a sweet southern bell and very pretty. I think she couold go far too. I loved the song they picked she sang for her mother.
Either way they will be both be a great choice.
Me and my mom started a tradition this year of having some milk and Oreo cookies while watching it, so have to say sorta glad its almost over. Its almost bikini weather and cookies are not helping!
Braided bracelet from vanessachristenson blog. I suggest watching the video for more info (and a little laugh) .
It took me a few tries to get it the right tightness.. I would get half way done and have a spot too loose and start over but finished my first bracelet..

It was actually a little too loose for me so I turned it into an anklet.

Next try I used my moms wrist to help so I wouldn't have to take it off my fingers and it worked a lot better.


its super cute and the color is bright and summery and looks great next to a tan (which I am working on) It looks pretty thick on but I like that, and good thing about it is the fabric is cloth so if it gets wet, it wont hurt it. But if you do ruin in its okay too because it is so simple to make once you get the hang of it. You could make one of every color and switch it up or where them all together!
On another note, Tonight was American Idol top 2 competing.. Scotty and Lauren. They both did great and are the youngest finalist yet so I am pretty excited to see who will be season 10's American idol.
Scotty is a great country singer.. his voice just melts your heart and he sounds like he could have an album out today. he is a cutie and a total sweet heart.

Lauren on the other hand is a great country singer too but has more of a range to me that I like. She is a sweet southern bell and very pretty. I think she couold go far too. I loved the song they picked she sang for her mother.
Either way they will be both be a great choice.
Me and my mom started a tradition this year of having some milk and Oreo cookies while watching it, so have to say sorta glad its almost over. Its almost bikini weather and cookies are not helping!
Monday, May 23, 2011
30 Day Challenge Day: Five
First off this is counted as the 5 day since I dont count my weekends.. I never do.. weekends are the oppisite of anything I do.. no work.. no exercise, just relaxing. So no I didnt miss a day, I just skipped it :)
So I broke down and made a Green Monster today. I have seen it everywhere on the web and the idea never sounded good to me.. I mean I actually always liked my veggies including spinach but...as a smoothie? I had a big bag of spinach left that I knew wouldnt be ate in time..so I caved..
In my smoothie I used what I had which was


Mixed it all together and it turned into a dark green, not as bright as the others which I was sorta hoping for just because it looked cool.
So after I made it, put a straw in and stared at it..


then put cleaned and put away my blender
AND stared at the Green Monster some more.
 .
.
I just couldnt get pass the idea of what was in it, but I took in some courage and took my first sip. Honestly.. wasnt bad.. Wasnt great but to me it was because it wasnt sweet enough.. and the yogurt was a little over powering.. So I cheated and added a little sugar into it. After that it was MUCH better. So I'm sure if you can put in some more naturally sweet fruits this drink could be really yummy and good for you.
So I broke down and made a Green Monster today. I have seen it everywhere on the web and the idea never sounded good to me.. I mean I actually always liked my veggies including spinach but...as a smoothie? I had a big bag of spinach left that I knew wouldnt be ate in time..so I caved..
In my smoothie I used what I had which was

raw Spinach
1 rip banana
vanilla yogurt (now wish I didnt use it.)
Cow milk
honey
and some frozen blue berries

Mixed it all together and it turned into a dark green, not as bright as the others which I was sorta hoping for just because it looked cool.
So after I made it, put a straw in and stared at it..

Put away the food and drinks
stared at it

then put cleaned and put away my blender
AND stared at the Green Monster some more.

I just couldnt get pass the idea of what was in it, but I took in some courage and took my first sip. Honestly.. wasnt bad.. Wasnt great but to me it was because it wasnt sweet enough.. and the yogurt was a little over powering.. So I cheated and added a little sugar into it. After that it was MUCH better. So I'm sure if you can put in some more naturally sweet fruits this drink could be really yummy and good for you.
Friday, May 20, 2011
30 Day Challenge Day: Four
Hello World!
 Today's craft was not really a craft as something new I decided to try and have always wanted to but thought it was complicated. A fish tail braid. BUT its actually very simple. Find a you tube video.. I sujest Foxylocksextensions . She made hers super small to make it stand out more.. I didnt feel like taking the time so mine is a little thicker. While you are on her page you should check out other videos from her, she has a lot of makeup and hair tutorials!
Well here is my first attempt!

That is NOT my best side.. lol But thats how mine turned out..
 Thanks for reading. See you all Tomorrow <3

Well here is my first attempt!

That is NOT my best side.. lol But thats how mine turned out..

Thursday, May 19, 2011
30 Day Challenge Day: Three
Day 3
Todays project was for me to making a whelping box for my pregger dog Bailey. She is a yorkie and this is my first set up pups so I'm a little overly protective of her.
This box is where she will have her puppies and where she will nurse her puppies for the first few weeks.
I took a big box and cut off the top flaps.

Then I cut a square on the side for her to walk into. I made it high enough to hopefully prevent the puppies from crawling out, but low enough so she doesn't have to hop in and risk hurting a pup.

I am thinking about taking the flaps I cut off and cut 3 1 1/2- 2 inch strips and put them onto the inside. This is to protect the puppies for if Bailey lays down against the box the strips will stick out to help prevent her from laying on a pup that may be against the box. This is optional, just as I said. I am overly protective :)

To finish it off I bought some new bath towels and a comfy blanket in it to lay on.
 And there you go. A simple (besides the optional part) whelping box for your pregnant pooch to relax in.
Todays project was for me to making a whelping box for my pregger dog Bailey. She is a yorkie and this is my first set up pups so I'm a little overly protective of her.
This box is where she will have her puppies and where she will nurse her puppies for the first few weeks.
I took a big box and cut off the top flaps.

Then I cut a square on the side for her to walk into. I made it high enough to hopefully prevent the puppies from crawling out, but low enough so she doesn't have to hop in and risk hurting a pup.

I am thinking about taking the flaps I cut off and cut 3 1 1/2- 2 inch strips and put them onto the inside. This is to protect the puppies for if Bailey lays down against the box the strips will stick out to help prevent her from laying on a pup that may be against the box. This is optional, just as I said. I am overly protective :)

To finish it off I bought some new bath towels and a comfy blanket in it to lay on.

Wednesday, May 18, 2011
30 Day Challenge Day: Two
This project was sort of a "duh" for me. I have been searching stores trying to find shorts that are just the right length because all I see is brumuda knee length or short short booty shorts. I need something just in the middle. So after my third store trip it hit me. Why dont I just make my own?
Of course you can do the simple cut off jeans. But I sorta prefer some cuff. So make it a little harder and make my first shorts with a sewn cuff.
Supplies
Jeans
Scissors
Chalk/pen/pencil to mark
Sewing machine
Pins
measuring strip
Take a baggier pair of jeans ( I say baggier just because when you cut and fold it will tighten a little and I prefer my shorts a little loose, but this is up to you) that you dont mind cutting up. Put them on and either take your measuring strip and try to mark your self or have a friend help you. its a lot easier and more accurate with a friend so you dont have to bend down to do it.
I marked the spot I would like the length to be on both out sides of my thigh
Marked the spot where I would cut and fold to get to my length (about 4-5 inches down from ideal spot) and then marked the inside of my thigh to try and keep the cut straight.
Take them off and cut.
Now on my first trial and error I took my jeans and just folded them where I wanted and sewn them all around. I didnt like how they looked afterwards (and on one leg messed up anyways)
 So on this set I will fold a slight hem and sew that. Then fold up to my ideal hem spot and just sew on a few spots. A small section on the outside thigh and on the inside of the thigh.
I was done with one leg before I realized I forgot to take pictures.. thats why one leg is all ready done.
 This picture is the pant leg layed out flat before fold
Next fold to make a hem. Pin and see.. I sewed close to the edge personally.. I am not an expert sewing so not sure which is the best to to do.. This was not the neatest job.. The pants are all old/too small so I am just using them as testers till I get a pair of jeans I really want to do this to. Thats why I am using black thread which I wouldnt on a pair I want.
Next Fold a hem again making sure not to let the thread peek out.. lining it up with your other pant.
 Pin and stitch the outsides vertically.Do it on the outside of your thigh on one the front and the back and on the inside thigh front and back

Of course you can do the simple cut off jeans. But I sorta prefer some cuff. So make it a little harder and make my first shorts with a sewn cuff.
Supplies
Jeans
Scissors
Chalk/pen/pencil to mark
Sewing machine
Pins
measuring strip
Take a baggier pair of jeans ( I say baggier just because when you cut and fold it will tighten a little and I prefer my shorts a little loose, but this is up to you) that you dont mind cutting up. Put them on and either take your measuring strip and try to mark your self or have a friend help you. its a lot easier and more accurate with a friend so you dont have to bend down to do it.
I marked the spot I would like the length to be on both out sides of my thigh
Marked the spot where I would cut and fold to get to my length (about 4-5 inches down from ideal spot) and then marked the inside of my thigh to try and keep the cut straight.
Take them off and cut.
Now on my first trial and error I took my jeans and just folded them where I wanted and sewn them all around. I didnt like how they looked afterwards (and on one leg messed up anyways)
 So on this set I will fold a slight hem and sew that. Then fold up to my ideal hem spot and just sew on a few spots. A small section on the outside thigh and on the inside of the thigh.
I was done with one leg before I realized I forgot to take pictures.. thats why one leg is all ready done.
 This picture is the pant leg layed out flat before fold
Next fold to make a hem. Pin and see.. I sewed close to the edge personally.. I am not an expert sewing so not sure which is the best to to do.. This was not the neatest job.. The pants are all old/too small so I am just using them as testers till I get a pair of jeans I really want to do this to. Thats why I am using black thread which I wouldnt on a pair I want.
Next Fold a hem again making sure not to let the thread peek out.. lining it up with your other pant.


Tuesday, May 17, 2011
30 Day Challenge. Day One
My first project is one I found that I didnt even give a second thought to because I just HAD to do it. Glitter Flats! Have any old/ugly flats lying around that could use a face lift? This project is pretty inexpensive and will give your shoes new life.
I sadly forgot to take a before picture of my shoes because I just got too excited and went right for it. But they were just plain black shoes with a little black bow on the toe.
Now you can follow the directions on the original site here or just stay here and listen to my instructions. Either way its so easy ' a Cave man could do it'.
Supplies
Mod podge (this can be picked up at a local craft store or even Walmart. Its a little more expensive but its well worth it since you can use it for so many different projects)
Flats. Any color. Doesnt matter, the glitter will cover up everything you want it to.
Glitter
Spray Adhesive/ glue
Sponge brush or paint brush
Plastic or paper plate
Something to lay down while doing your project so not to get anything on your work station (new paper, plastic bag)
First pour some Mod Podge on your plate and mix with glitter. Use a lot of glitter, dont be stingy
Next start painting your shoes. I held the inside of it so not to mess up the painted parts. Coat it all on and let it dry. She said it took about 25 minutes for hers to dry, but mine took a lot longer and I never even let it fully dry in some spots before I started on another coat. So just let it sit and check back on it from time to time until you think you wanna coat again.

Now at this point, its looking pretty ugly. But dont fear! The mod podge will dry clear.

I did about 4 coats. Making sure all the black was covered up.
Once your last coat drys spray on your glue to secure it in and let that dry
And there you go! New and improved glitterific flats! Perfect for snazzying up any occasion.


I think these flats I will use for Christmas time and New years. But I will be making some more soon in different colors.
If you have any questions or just want to show off your work just give me a comment. I will be happy to help and see your finished worked! :)
My photos are not the best but they are a lot sparklier in person. Trust me :)
Wednesday, May 11, 2011
30 Day Challenge
Hello Blog world. Its been awhile... So I decided to come back with something fun. I love crafts. Crocheting, sewing, all things crafty really. Lol But... I have a problem with procrastinating AND giving up.
So decided to test myself with a little challenge. I will use Stumbleupon to randomly choose a craft to do for 30 days.
( ideally it will be one craft a day for 30 days, but if I do get lazy that means I would have to step it up and do 2 a day to make up for it)
I will Get started Monday. Need this weekend to gather any random supplies and such so I wont have any reason not to do my craft.
So lets see how it goes. Wish me luck! I will be posting pictures. Links and such when I do them.
Wednesday, February 16, 2011
Happy Valentines Day...Month!

But anyways! Happy Valentines Month! Or Single Awareness!
And this lovely Valentines Was brought to me, to you by Jordan. Who by the way is having a valentine giveaway on her blog. Go check it out and show some V-Month Love!
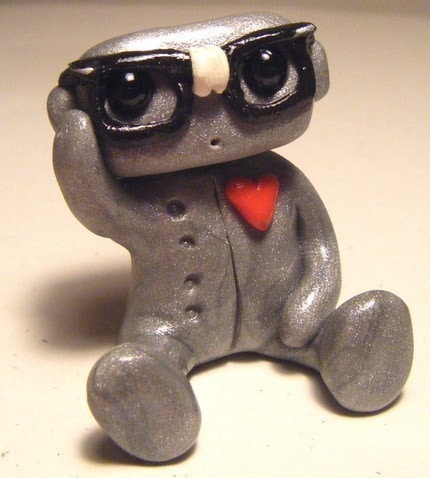
So to start off, I am in two swaps this month. Love and Romance and Robots. Which I am excited about. I mean if you couldn't figure it out I am a little bit geeky on the inside and cute robots are a weakness.
I am almost done with my packages and I will take pictures and post them up here once my giftees receive this so as not to spoil the surprise. Also will do the same for their packages.Right now I'd like to share some amigurumi Cuteness I made!
 Who likes mamegoma? I made this little guy for my January swap partner Holly. The pattern was for a regular seal. But to make him look more like the beloved mamegoma , when I was closing up his face I switched to a sea blue.And I didnt make the nose. Than added a cute face and (hard to tell in the webcam photo) Added some pinkish to his cheeks for the blush. I like he is pretty darn adorable for a first try! Want to make your own mamegoma? Click Here! Pattern is made by Suzy Alise.
 This cutie I just loved! It was hard for me to give him away (he also went to Holly) I used the same blue as I did for the mamegomas mouth and it just looks amazing in person how bright and sweet he looks. Mr. Penguin is at a good home now and I will be sure to make a few more for my home! I am thinking a blue one again and a pink one too.. maybe lime green also? I just love bright colors! You can get this pattern for free from Lionbrand.com. All you need to do is sign up, which you should want to do with so many cute free patterns. Penguin Pattern
My next lovables will be posted soon with the love and robot theme. I may also make a few more in the spear time and will add them here for you to see.
Till then. xoxo
Tuesday, February 1, 2011
Etsy Round Up Part 2
So incase you didnt know. Etsy is pretty much amazing. So many great things by talented people. So here is my new round up of things that made me smile from Etsy.

First up is MouthyMitts with some amazing knits. These cute I [heart] nerd wrist warmers are a must have.Cute and detailed. Along with her cup cozy and other cute knits this is one of my favorite shops. Show off your nerd love with some knits from MouthyMitts

Next on my list is mymimi Who was a toy designer for many years until she decided to go independent. Her creations are so cute and well detailed. I seriously want to buy them all! Her pillows come to life. and with other kawaii items such as tic tac toe belt buckles and emoticon face pins there is really something for everyone. Child, teen or kid at heart adult. This shop is a must see for cute.
 Another shop dear to my heart is TNZsculptures . She has many cute sculptures for a great price. Everything from Alice in wonderland, teenage mutant ninja turtles to tough cupcakes and "wiener dogs" very detailed and so cute. She does custom orders and I know you are just itching to ask her to make that perfect something to sit on your desk to watch your work.
 The last on my list for today is alpinebutterfly and I have to admit it is pretty much just because of this cool recycled cat bed. I think it is the ultimate geek habitat for your favorite pet. And recycling is always A+ . This is super cute and will make any geek room chic.
I think I am starting to let my inner geek out with Etsy. But hey who isn't a little geek?
First up is MouthyMitts with some amazing knits. These cute I [heart] nerd wrist warmers are a must have.Cute and detailed. Along with her cup cozy and other cute knits this is one of my favorite shops. Show off your nerd love with some knits from MouthyMitts
Next on my list is mymimi Who was a toy designer for many years until she decided to go independent. Her creations are so cute and well detailed. I seriously want to buy them all! Her pillows come to life. and with other kawaii items such as tic tac toe belt buckles and emoticon face pins there is really something for everyone. Child, teen or kid at heart adult. This shop is a must see for cute.
Another shop dear to my heart is TNZsculptures . She has many cute sculptures for a great price. Everything from Alice in wonderland, teenage mutant ninja turtles to tough cupcakes and "wiener dogs" very detailed and so cute. She does custom orders and I know you are just itching to ask her to make that perfect something to sit on your desk to watch your work. I think I am starting to let my inner geek out with Etsy. But hey who isn't a little geek?
Saturday, January 22, 2011
Snow Day IceCream
Hello friends. :)
Like many of you, we just had a new fresh snow leaving several inches of snow on the ground. I was looking at cheezburger.com and the inner site called Must Have Cute and found someone who blogged about having a snow Ice cream day. So decided to try it. Used fresh (still falling) snow from our patio railings and my 3 yr old nephew helped out. It is super easy. All you need it : Fresh snow, milk, sugar, something for taste (vanilla) and food coloring.
Here are a few pictures of my modeling nephew afterward.
 He wanted to mix all the colors in his..

Yummmmmmy :)
Needs more sprinkles....

Pretty yummy, but tip. If you put it back in the freezer, you can prob put it in less than an hour because it freezes pretty hard. Just add some more milk to soften it up.
Like many of you, we just had a new fresh snow leaving several inches of snow on the ground. I was looking at cheezburger.com and the inner site called Must Have Cute and found someone who blogged about having a snow Ice cream day. So decided to try it. Used fresh (still falling) snow from our patio railings and my 3 yr old nephew helped out. It is super easy. All you need it : Fresh snow, milk, sugar, something for taste (vanilla) and food coloring.
Here are a few pictures of my modeling nephew afterward.


 |
Yummmmmmy :)
Needs more sprinkles....

Pretty yummy, but tip. If you put it back in the freezer, you can prob put it in less than an hour because it freezes pretty hard. Just add some more milk to soften it up.
ravelry swaping
Hello fellow bloggers. I thought I would mention what is going on this weekend. I belong to this awesome site for all knitters and crocheters. It's called Ravelry and in it you can join groups where you can join in swaps.. with different themes and fun people. At the moment I am in the cute and quirky group and our swap theme is kawaii critters. The mod of this fun blog is Jordon and she also has a pretty nice blog you can check out.
My swap partner is Rinibugg and so far having a fun time putting things together. Will not mention what in case she wonders upon here and her surprise is spoiled. But I will post pics once She has received her parcel.
I was in another swap called Ho Ho Ho for Christmas, and my swapper turned out to be naughty :( Luckily I had amazing angels to send me things.
Wendy sent me the Stitch n Bitchin crochet book I been wanting.
Nikoline sent me an amazon book, the girl who played with fire.

knittinkatz sent me a lovely package with so much goodies in it, I will just post a picture.------>
That is all for now, but will be posting again real soon with our first SnowDay IceCream. :)
Thursday, January 13, 2011
Etsy top picks of the day
So I have rekindled my love for etsy and thought I'd share a few shops that I think are on my top list and favorites. You can never go wrong with something hand made that is also cute and useful! Win Win! So here is my top uber cute handmade goodies. :)
Sleepyrobot13 is first today on my list. She hand makes the cutest robots (along with a few other things such as zombie toast) they are all hand done and adorable. Everything from nerdy robot, zombie robot, girly to custom made items such as robots wearing a panda suit! These are something I would want to collect and have them all!

Next up is sophiesbeads. Her main seller is her custom made book charms.Perfect for any book lover! The details on the miniature books are so amazing it looks as if she just literally shrunk your favorite book! She is very friendly and helpful and makes custom orders as well, adding on beads and charms to the bracelet. She has also done a few other custom orders such as making a mini guitar hero! so whether its a book lover or a gamer, this could be the perfect buy.

Third on my list is KMStudioDOTcom . She takes recyling pop cans and turns them into something useful and oh so cute! She has made book marks, hello kitty necklaces, dragonfly hair clips and so much more using your favorite can of diet mountain dew or maybe Arizona tea.

And last but not least is TwinkieChan . She takes yummy food and crocheting to the next level! Love sushi? why don't you show that love off with a sushi scarf!Or how about a cupcake hat? The choices are almost endless with tons of yummy breakfast dinner and desert items you can wear! She also has a book out , twinkie chans crochet goodies for fashion foodies Which will let you make these yummy wearable yourself!
Who's on your top list?
Sleepyrobot13 is first today on my list. She hand makes the cutest robots (along with a few other things such as zombie toast) they are all hand done and adorable. Everything from nerdy robot, zombie robot, girly to custom made items such as robots wearing a panda suit! These are something I would want to collect and have them all!
Next up is sophiesbeads. Her main seller is her custom made book charms.Perfect for any book lover! The details on the miniature books are so amazing it looks as if she just literally shrunk your favorite book! She is very friendly and helpful and makes custom orders as well, adding on beads and charms to the bracelet. She has also done a few other custom orders such as making a mini guitar hero! so whether its a book lover or a gamer, this could be the perfect buy.
Third on my list is KMStudioDOTcom . She takes recyling pop cans and turns them into something useful and oh so cute! She has made book marks, hello kitty necklaces, dragonfly hair clips and so much more using your favorite can of diet mountain dew or maybe Arizona tea.
And last but not least is TwinkieChan . She takes yummy food and crocheting to the next level! Love sushi? why don't you show that love off with a sushi scarf!Or how about a cupcake hat? The choices are almost endless with tons of yummy breakfast dinner and desert items you can wear! She also has a book out , twinkie chans crochet goodies for fashion foodies Which will let you make these yummy wearable yourself!
Who's on your top list?
Tuesday, January 11, 2011
Cruching and crocheting
So it is finally the new year! that means Christmas is over and luckly got all my crocheting done. Next time will start earlier! Also trying to "crunch away" all those holiday sweets and over eating!
Though recently I made a late Christmas present for my friend Jacob :) He made me a picture so I made him a beanie. It is a basic "skater" beanie but thought I'd share the pattern I used with you incase you wanted to make a quick project for a friend in these cold times...
This is the first time I ever written a pattern and I also done this pattern just at the top of my head so wrote down out of memory. Let me know if anything is wrong. Thanks!

Materials
1Using Gray yarn.Start off with a magic ring, or just chain 1 SC 6 and Slip Stich into the second stitch to make a circle.
2. 2SC in each stich (12)
3.Increase ,sc next stitch. Repeat till end of round
4. 'Increase, sc in the next 2 sc ' repeat till end
5. Inc, sc in next 3 sc . repeat
6. Inc, sc in next 4 sc. repeat
7. Inc, sc in next 5 sc . repeat
8.Inc, sc in next 6 sc. repeat
9. Sc around
10. Inc sc in next 7 sc. repeat
11. Inc sc in next 8 sc. repeat
12. Inc, sc in next 9 sc. repeat
13. Inc, sc in next 10sc repeat
14. Inc, sc in next 11 sc . repeat
15. Inc. sc in next 12 sc. repeat
16. Inc, sc in next 13 sc. repeat till end of row.
(now this is about as big as I made mine, I think it fits most peoples heads)
17- 29 sc around(this depends on how long you want it, try it on every couple of rows and see where you want it to stop. If you get closer to wanting to stop before you reach the end of the pattern just start to sc with the black.)
30 . switch to black sc around
31-32. (black) sc around
33. switch to gray. Sc around
34-36. (gray) sc around
37. Switch to black sc around. Slip stitch together and FO.
Though recently I made a late Christmas present for my friend Jacob :) He made me a picture so I made him a beanie. It is a basic "skater" beanie but thought I'd share the pattern I used with you incase you wanted to make a quick project for a friend in these cold times...
This is the first time I ever written a pattern and I also done this pattern just at the top of my head so wrote down out of memory. Let me know if anything is wrong. Thanks!

Materials
- Gray medium weight yarn
- Black medium weight yarn
- crochet hook size #
- stitch marker
1Using Gray yarn.Start off with a magic ring, or just chain 1 SC 6 and Slip Stich into the second stitch to make a circle.
2. 2SC in each stich (12)
3.Increase ,sc next stitch. Repeat till end of round
4. 'Increase, sc in the next 2 sc ' repeat till end
5. Inc, sc in next 3 sc . repeat
6. Inc, sc in next 4 sc. repeat
7. Inc, sc in next 5 sc . repeat
8.Inc, sc in next 6 sc. repeat
9. Sc around
10. Inc sc in next 7 sc. repeat
11. Inc sc in next 8 sc. repeat
12. Inc, sc in next 9 sc. repeat
13. Inc, sc in next 10sc repeat
14. Inc, sc in next 11 sc . repeat
15. Inc. sc in next 12 sc. repeat
16. Inc, sc in next 13 sc. repeat till end of row.
(now this is about as big as I made mine, I think it fits most peoples heads)
17- 29 sc around(this depends on how long you want it, try it on every couple of rows and see where you want it to stop. If you get closer to wanting to stop before you reach the end of the pattern just start to sc with the black.)
30 . switch to black sc around
31-32. (black) sc around
33. switch to gray. Sc around
34-36. (gray) sc around
37. Switch to black sc around. Slip stitch together and FO.
Subscribe to:
Posts (Atom)


